
Box pictures-everyones!

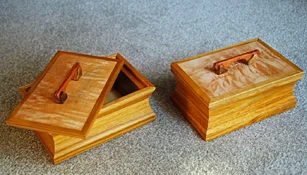
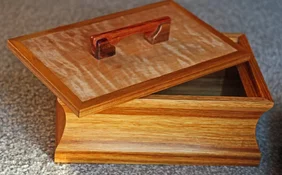
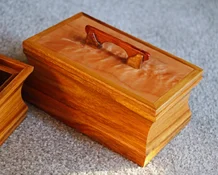
I saw photos of Mike's ( @Mike1950 ) boxes a few years ago and he makes these boxes with gorgeous coved sides. I've wanted to try that ever since and finally got up the nerve over the last two weeks. I had some beautiful canary wood boards I got from David ( @gvwp ) and they were closer to 3/4" thick which made them perfect for cutting coves. Used one of the curly maple thins I got from Mike for the lid panels. And thank goodness - NO stinkin' hinges! - the handles are canary and some leftover pieces of figured redwood with tiny 1/8" dowel pins to strengthen the glue joint. These two are twins, same size, etc. These boxes are nominally 6x4x3.5 inches deep. Finished with several coats of satin wipe-on poly, then micro pad and then waxed with paste wax. Nice smooth, silky feel.

The cove making process went pretty smoothly. But I have to admit to one mistake. If you look close at the coves you'll see they aren't centered on the box side. The cove is closer to the top than to the bottom. I thought I measured and positioned my fences properly but obviously not. The blade on my table saw does not raise straight up, it rotates upward on an arc. As a result, the center of the cove moves closer to one side than the other. In the end, it actually worked out perfectly. Because when I made the lids and cut the rabbets to fit them, the box section above the cove ended up being the exact same width as the bottom below the cove. So it looks like I knew what I was doing. Sssssh, don't tell anyone.
finished both boxes.webp

single box open lid.webp

single box close lid.webp
 
Last edited:
I saw photos of Mike's ( @Mike1950 ) boxes a few years ago and he makes these boxes with gorgeous coved sides. I've wanted to try that ever since and finally got up the nerve over the last two weeks. I had some beautiful canary wood boards I got from David ( @gvwp ) and they were closer to 3/4" thick which made them perfect for cutting coves. Used one of the curly maple thins I got from Mike for the lid panels. And thank goodness - NO stinkin' hinges! - the handles are canary and some leftover pieces of figured redwood with tiny 1/8" dowel pins to strengthen the glue joint. These two are twins, same size, etc. These boxes are nominally 6x4x3.5 inches deep. Finished with several coats of satin wipe-on poly, then micro pad and then waxed with paste wax. Nice smooth, silky feel.

The cove making process went pretty smoothly. But I have to admit to one mistake. If you look close at the coves you'll see they aren't centered on the box side. The cove is closer to the top than to the bottom. I thought I measured and positioned my fences properly but obviously not. The blade on my table saw does not raise straight up, it rotates upward on an arc. As a result, the center of the cove moves closer to one side than the other. In the end, it actually worked out perfectly. Because when I made the lids and cut the rabbets to fit them, the box section above the cove ended up being the exact same width as the bottom below the cove. So it looks like I knew what I was doing. Sssssh, don't tell anyone.
View attachment 292798

View attachment 292799

View attachment 292800
Very very good.
 
I saw photos of Mike's ( @Mike1950 ) boxes a few years ago and he makes these boxes with gorgeous coved sides. I've wanted to try that ever since and finally got up the nerve over the last two weeks. I had some beautiful canary wood boards I got from David ( @gvwp ) and they were closer to 3/4" thick which made them perfect for cutting coves. Used one of the curly maple thins I got from Mike for the lid panels. And thank goodness - NO stinkin' hinges! - the handles are canary and some leftover pieces of figured redwood with tiny 1/8" dowel pins to strengthen the glue joint. These two are twins, same size, etc. These boxes are nominally 6x4x3.5 inches deep. Finished with several coats of satin wipe-on poly, then micro pad and then waxed with paste wax. Nice smooth, silky feel.

The cove making process went pretty smoothly. But I have to admit to one mistake. If you look close at the coves you'll see they aren't centered on the box side. The cove is closer to the top than to the bottom. I thought I measured and positioned my fences properly but obviously not. The blade on my table saw does not raise straight up, it rotates upward on an arc. As a result, the center of the cove moves closer to one side than the other. In the end, it actually worked out perfectly. Because when I made the lids and cut the rabbets to fit them, the box section above the cove ended up being the exact same width as the bottom below the cove. So it looks like I knew what I was doing. Sssssh, don't tell anyone.
View attachment 292798

View attachment 292799

View attachment 292800
Nice work. For anyone that wants to try, there is a "build da box" thread in the class room.
The cove, I got inspiration from a drawer.

20230828_072012.webp
 
I saw photos of Mike's ( @Mike1950 ) boxes a few years ago and he makes these boxes with gorgeous coved sides. I've wanted to try that ever since and finally got up the nerve over the last two weeks. I had some beautiful canary wood boards I got from David ( @gvwp ) and they were closer to 3/4" thick which made them perfect for cutting coves. Used one of the curly maple thins I got from Mike for the lid panels. And thank goodness - NO stinkin' hinges! - the handles are canary and some leftover pieces of figured redwood with tiny 1/8" dowel pins to strengthen the glue joint. These two are twins, same size, etc. These boxes are nominally 6x4x3.5 inches deep. Finished with several coats of satin wipe-on poly, then micro pad and then waxed with paste wax. Nice smooth, silky feel.

The cove making process went pretty smoothly. But I have to admit to one mistake. If you look close at the coves you'll see they aren't centered on the box side. The cove is closer to the top than to the bottom. I thought I measured and positioned my fences properly but obviously not. The blade on my table saw does not raise straight up, it rotates upward on an arc. As a result, the center of the cove moves closer to one side than the other. In the end, it actually worked out perfectly. Because when I made the lids and cut the rabbets to fit them, the box section above the cove ended up being the exact same width as the bottom below the cove. So it looks like I knew what I was doing. Sssssh, don't tell anyone.
View attachment 292798

View attachment 292799

View attachment 292800
Downright beautiful set of twins! Love the coves & wood selection. Finish is top-notch, also. I’m about to embark on a box making journey later this year, and your efforts are inspirational. Chuck
 
I dropped off 6 of my most recent boxes at a local non-profit called Healing Reigns. They use horses and other farm animals to help people overcome developmental and physical disabilities. I like them because it seems to be a well run organization and there's no frivolous money spent on frilly things like fancy offices, etc. All the money goes into running the program. I've never sold or donated wood projects before so I asked several people on here for their advice. Ended up setting minimum bids of $70 - $150 on the boxes. We'll see how it goes.
 
This is another Jerry ( @Nubsnstubs ) inspired creation, hope he doesn't start charging me royalty fees or something. Jerry sent me a box of cholla and filled the leftover voids with some misc burl thin slices. Not sure exactly what this one is, might be more of that tamarind (salt cedar). Anyway, it was a slice about 1/8 - 3/16" thick so it made a nice inlay piece. But it was too long and it had these straight edges that just didn't look right to me. So I used a jewelers fret saw to cut off one end, making rough ins and outs to mirror the natural edge portion of the burl. Came out pretty well.
lid showing how burl was cut.webp

lid burl close up.webp

For the box itself I had some cherry that I got from someone on here, sorry, I once again deleted the texts that tell me who from. It had a tiny bit of figure on one side but I think I sanded most of that away because I don't see any figure remaining. I have a bunch of black ebony strips I saved so decided to inlay those on the sides and use some for the splines. The lid is the last small pieces of mongo rosado from Brazil and a rainbow poplar panel. NO stinkin' hinges!! The depth of the box allows for a small tray inside so I made one that fills about half the opening and is an inch deep. The final coat of finish is still drying so it's not in the photos.

full box.webp

lid open.webp
 
I saw photos of Mike's ( @Mike1950 ) boxes a few years ago and he makes these boxes with gorgeous coved sides. I've wanted to try that ever since and finally got up the nerve over the last two weeks. I had some beautiful canary wood boards I got from David ( @gvwp ) and they were closer to 3/4" thick which made them perfect for cutting coves. Used one of the curly maple thins I got from Mike for the lid panels. And thank goodness - NO stinkin' hinges! - the handles are canary and some leftover pieces of figured redwood with tiny 1/8" dowel pins to strengthen the glue joint. These two are twins, same size, etc. These boxes are nominally 6x4x3.5 inches deep. Finished with several coats of satin wipe-on poly, then micro pad and then waxed with paste wax. Nice smooth, silky feel.

The cove making process went pretty smoothly. But I have to admit to one mistake. If you look close at the coves you'll see they aren't centered on the box side. The cove is closer to the top than to the bottom. I thought I measured and positioned my fences properly but obviously not. The blade on my table saw does not raise straight up, it rotates upward on an arc. As a result, the center of the cove moves closer to one side than the other. In the end, it actually worked out perfectly. Because when I made the lids and cut the rabbets to fit them, the box section above the cove ended up being the exact same width as the bottom below the cove. So it looks like I knew what I was doing. Sssssh, don't tell anyone.

View attachment 292798

View attachment 292799

View attachment 292800
Gorgeous boxes! 👍
 
This is another Jerry ( @Nubsnstubs ) inspired creation, hope he doesn't start charging me royalty fees or something. Jerry sent me a box of cholla and filled the leftover voids with some misc burl thin slices. Not sure exactly what this one is, might be more of that tamarind (salt cedar). Anyway, it was a slice about 1/8 - 3/16" thick so it made a nice inlay piece. But it was too long and it had these straight edges that just didn't look right to me. So I used a jewelers fret saw to cut off one end, making rough ins and outs to mirror the natural edge portion of the burl. Came out pretty well.
View attachment 293248

View attachment 293249

For the box itself I had some cherry that I got from someone on here, sorry, I once again deleted the texts that tell me who from. It had a tiny bit of figure on one side but I think I sanded most of that away because I don't see any figure remaining. I have a bunch of black ebony strips I saved so decided to inlay those on the sides and use some for the splines. The lid is the last small pieces of mongo rosado from Brazil and a rainbow poplar panel. NO stinkin' hinges!! The depth of the box allows for a small tray inside so I made one that fills about half the opening and is an inch deep. The final coat of finish is still drying so it's not in the photos.

View attachment 293250

View attachment 293251
Stunning! Exquisite!
 
Thanks John and Chuck,
I'm mostly trying to make use of stuff I have on hand and it's kind of a challenge and fun to see if I can create something that looks like it actually was intentional rather than something that was just slapped together because that's all I had. I have lots of little scraps and small blanks left over from my reel seat insert days.
 
Back
Top