What did you do in your shop today?

That's looking good Greg.

I know you aren't looking for more work on producing these, but seeing the router burn made me think that if that routered edge was colored, it would really look sharp and highlight the face of the cross.

Couldn't stain it, would probably need to paint it. Could then clean the top with sanding as necessary.

Like torching the edges and then sanding the flats color contrasting?
Thanks guys, those are some great ideas. I think I'll try one with the burnt edge and sanded flat. I wonder if blo would seal them after burning? I like the spray on water-based poly but it's costly for a large run uf these.
 
The BLO will seal them, but will also give more amber color, which might be ok against the darker burned sides. The main thing is BLO won't give as smooth a finish as the film of a poly will.

I know you don't like using solvent finishes in the house, so what about a quart of brush on WB poly? Not as convenient as the spray, but maybe cheaper? Or, if the smell doesn't bother you too much, some regular oil base poly is cheaper than the WB.
 
Nice that your saw is up & running! Be sure to share pics of the Birch tree wood when able. Chuck
Rained last night, warmed up enough the frost was coming out of the ground. The rain became a heavy mist all day, so foggy I could not get any clear pictures. The tree top disappeared in the mist about 30 feet up. It was a 70 footer, Black birch, dead 2 seasons, enough that all of the sapwood was punk. It had a small heart between 1/4 and 1/3 the diameter. Lattered it, roped it to a snatch block and back to an old Massey, and felled with the rebuilt Husky 50. Bucked it all and the saw ran great, so think it was worth my time.

After splitting, we adjusted the carb on the Poulan I rebuilt yesterday. Then adjusted the carb on a Husky 460 rancher I overhauled. It was burned in a structure fire and insurance said safer to replace than repair. That was a last winter project. Got like 10 chainsaws so decided to Market Place the 460. Wife says I need to reduce clutter.
 
The BLO will seal them, but will also give more amber color, which might be ok against the darker burned sides. The main thing is BLO won't give as smooth a finish as the film of a poly will.

I know you don't like using solvent finishes in the house, so what about a quart of brush on WB poly? Not as convenient as the spray, but maybe cheaper? Or, if the smell doesn't bother you too much, some regular oil base poly is cheaper than the WB.
I have some brush on wb poly, might give it a try. But I'm also going to try the blo, I think the warmer color will look better. Dry time sucks though, lol. Wb poly dries super quick. Thanks for the thoughts.

I showed the prototype to the pastor at church and we talked about how to best use them as a fund raiser. His thought was to accept donations for specific help programs at the church and with certain amount donated (to be determined) recieve one of the crosses. The church general fund is healthy but some of the other programs could use a boost.
I'll provide my time and materials as my contribution.
 
Well guys I tried your idea and I think I like it. I also used blo on it. The burnt sections soak it right up, it'll probably need another coat or 2.
20241231_172545.webp 20241231_172552.webp
What do you guys think?
 
I did some pattern routing. I find the trick to this is to cut them on the scroll saw with a very course blade almost to the line so that you are not removing much material on the router table. You must go very ow and keep firm pressure against the bit on the rounded ends because the grain of the wood changes direction. I pretty much ruined the first couple I did due to major chip out. It's a learning curve, I'm getting better at it.
20250101_162706.webp
Next up will be round over.
If you want to get good at something do a production run, lol.
 
I did some pattern routing. I find the trick to this is to cut them on the scroll saw with a very course blade almost to the line so that you are not removing much material on the router table. You must go very ow and keep firm pressure against the bit on the rounded ends because the grain of the wood changes direction. I pretty much ruined the first couple I did due to major chip out. It's a learning curve, I'm getting better at it.
View attachment 266117
Next up will be round over.
If you want to get good at something do a production run, lol.
You are getting these production runs down to a science! I echo your comments about the value of production runs in gaining efficiencies. Chuck
 
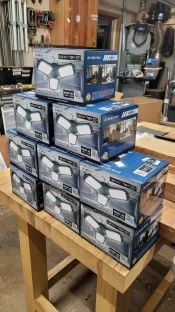
Well, I needed new lighting in the shop. The lights that I bought when I was setting up shop when we moved here just did not last. After about 2 1/2 years they started to die - and then I realized, looking at them on Amazon's website where I ordered them from, that they had a 3 year warranty. I contacted the seller through Amazon, they asked for a few pictures, and sent me new ones. Which I then put up - and figured the replacements wouldn't last either, but they would at least get me by for a while.

Well, the time had come. Over the last months, the replacement light fixtures started to die. I had 18 fixtures mounted to the ceiling, and was down to 5 of them working. 25k lumens vs. the 90k lumens I should have been getting if they were all functioning just wasn't cutting it.

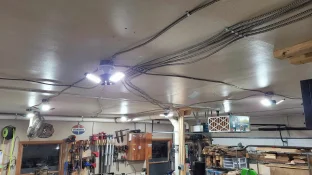
Last night at Menards I picked up everything to redo the lighting in the shop. The previous fixtures plugged in, so I had a couple outlets on the ceiling on a switch. These LED panel lights have come a long ways in options and lighting output, and have really come down a lot in price, since we moved and I was considering lighting for this shop 5 years ago. So that's the direction I went now. It meant that I would have to do some wiring - I put 9 boxes/light sockets up and had to wire them all (and removed the outlets). Went with 10K lumen lights, so have the same 90k lumens I had previously. Total cost, with Menards having a 15% off whatever you can fit in the paper bag sale (and my wife taking my second bag through the checkout since it all was not fitting in one...), was about $200 for everything - 50' of armored cable, boxes, light sockets, and the bulbs.

Did not want to have to do this project - intended that the wiring/lighting project of nearly 5 years ago be a once and done thing and shoulder issues make overhead work challenging for me - but I am very happy with how it turned out. Gives me the same level of lighting as I previously had.

And the really nice part is that now, if any of the lights go out, it's just as simple as changing a light bulb, instead of swapping out light fixtures...
467460909_3860256694231637_2169894632974093214_n.webp

470051875_3106370912848301_6938591078548897041_n.webp
 
Thanks for showing those lights. I've still got a few incandescent floods in the shed that don't cut it anymore with the warm light. I'll have to pick a few of these up and get rid of the last of the incandescent. Just wish the LED would last as long. I know some of the old lights have been in place for at least 20 years.
 
I find that any of these manufacturers claims of lifespan are not accurate. It all started with the curly fluorescent bulbs, they wouldn't last but a couple of years. Then leds hit the market, same story at first. They seem to have gotten better over the years. But man I really do like the light they put out! A few years back I switched the shop and garage over to Honeywell 4' 2 row lights. They have held up well, only one in the garage has a partial failure. My whole house is led, been that way for years. My cameras do not like the shop lights no matter how I set them. I get lines, bars, and shadows. I think this also varies with the manufacturer, some are worse than others it seems. Let us know how these work with taking photos. Your shop looks well lit again.
 
Tim, you're definitely not going to get the 20+ year you've gotten out of some of those incandescent bulbs. But, like a lot of things, there's always a trade off. Improved lighting, but overall shorter lifespan. To be honest, I couldn't imagine trying to illuminate a shop space with incandescent bulbs at this point and think the investment is worth it.

Greg, I agree with you. I really like the light that LED lighting can put out. But lifespan claims are vastly exaggerated.

But, let's be honest. We might grumble about it. We might even say we're willing to pay the price required for a LED bulb that would truly last the lifespan they claim. But when it comes to getting out our wallets and doing it, who of us would? These panel light bulbs, at full price, are $14/each. That's affordable, even if you have to replace one or two a year. Would I prefer a light or bulb that, on average, lasts as long as they advertise it will? Most definitely. But I'm also not certain I want to see the price on it either, knowing that the price of such a light or bulb would be out of reach for most people, especially if they're running multiples in a workshop...
 
Roundover is done on both sides.
20250104_161903.webp
Lightly mop sanded.
20250104_163937.webp
Edge burning is done.
20250104_175450.webp 20250104_175504.webp
Next will be flat sanding the faces.
 
Well I got the approval at the church today to sell these crosses. More of a donation to the benevolence fund. For a donation of $20 dollars or more you can pick a cross. I had a man on another forum request 2 of them, so I think these are gonna go fast also. So I started prepping stock for another batch.
Anyone care to guess this species?
20250105_172048.jpg
More to be planed down. A mix of maple, box elder, and one piece of walnut.
20250105_172121.jpg
A burn day is in my future. Or at least get it carried upstairs to the outside burn box.
20250105_172140.jpg
 
Last edited:
Back
Top