Box pictures-everyones!

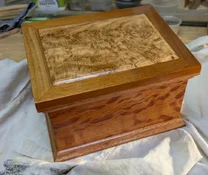
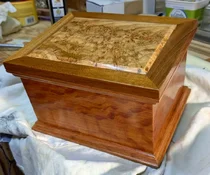
Here's my latest box. Approx 6" x 4.5" x 4 " deep. Hinged lid (did I mention I hate hinges?). This one started with a turning block of figured redwood I got from someone on here. I made another box previously from it and had already sliced it into thins. For a different challenge I added the trim base and rim. I got two thin slices of tamarisk burl from Jerry ( @Nubsnstubs ) some time ago and wanted to put them to good use. I spliced them together with a long spline down the middle. The usable section was just shy of being able to cover the entire lid so I added a frame of mongo rosado and mahogany, might be some cherry in there, not sure. Finished with several coats of satin wipe-on poly, then micro pad and waxed with Min Wax paste wax. I really like the way the wood and colors work together on this one.

finished box.webp

finished box closer.webp
 
Last edited:
Here's my latest box. Approx 6" x 4.5" x 4 " deep. Hinged lid (did I mention I hate hinges?). This one started with a turning block of figured redwood I got from someone on here. I made another box previously from it and had already sliced it into thins. For a different challenge I added the trim base and rim. I got two thin slices of tamarisk burl from Jerry ( @Nubsnstubs ) some time ago and wanted to put them to good use. I spliced them together with a long spline down the middle. The usable section was just shy of being able to cover the entire lid so I added a frame of mongo rosado and mahogany. Finished with several coats of satin wipe-on poly, then micro pad and waxed with Min Wax paste wax. I really like the way the wood and colors work together on this one.

View attachment 292170

View attachment 292171
Decadent! Think we need to see the inside & the hinges. Chuck
 
Great looking box! If it were me, I would have left it with a lift off lid. Because like you, I HATE hinges! It takes so much more time to add them and hardly ever come out really well, without having to 'adjust' the box or hinge somehow. I don't like the look of any hinge on my boxes. I prefer the barrel type, so you don't see them much. I've gotten better at installing them too. Again, nice job!
 
I hate hinges.

Fine, here ya' go. Mortised in with my Dremel. No matter how precise I try to be, I can never get the lid to fit exactly and always have to do some final "fit up" sanding.
View attachment 292176
Your perceived lack of craftsmanship on the hinges is greatly overshadowed by the absolute beauty of the box itself. I’m queuing up to build some boxes, and I’m hoping mine begin to approach your level of expertise, with its focus on top-notch wood and immaculate finish. Chuck
 
Great looking box! If it were me, I would have left it with a lift off lid. Because like you, I HATE hinges! It takes so much more time to add them and hardly ever come out really well, without having to 'adjust' the box or hinge somehow. I don't like the look of any hinge on my boxes. I prefer the barrel type, so you don't see them much. I've gotten better at installing them too. Again, nice job!
Mark, when you describe a hinge as a barrel hinge, is that one that you have to drill 3/8 x 1/2" deep matching holes to mount them? If so, can you please tell me how you do it and how thick your sides are? ............... Nubs
 
Your perceived lack of craftsmanship on the hinges is greatly overshadowed by the absolute beauty of the box itself. I’m queuing up to build some boxes, and I’m hoping mine begin to approach your level of expertise, with its focus on top-notch wood and immaculate finish. Chuck
Three things that improved my boxes the most:
(1) Making exact 45 degree miters. Either make a very solid precise sled for your table saw or measure and adjust your miter saw, then make a first cut almost on your line, then a second very thin cut right on your line. Helps keep the blade from deflecting and wandering.
(2) This threaded rod frame clamp is super helpful and accurate. I can quickly put box sides in this thing and check for fit, accuracy etc. and just as quickly take them back out to make adjustments. It acts as a third hand when I need it and holds wood pieces firmly enough to sand, use a Dremel, etc. And it is quick and accurate for glue ups. This one is made by Hargraves. It's pretty old, it was my Dads.
(3) Don't rely on measurements and pencil marks for side lengths. What matters the most is that the opposite sides are exactly the same length. So make one side, then cut one miter in the opposite side. Then put the first side back in the sled or on your miter saw against the blade teeth (not against the inner surface of the blade). Then clamp a stop block against the length of this side. Then put the miter of the second side against the stop block and make your final cut on the opposite side. This ensure those two sides are exactly the same length. Do the same thing for the other set of sides. If you made exact 45 degree miters and the sides are exactly the same length your box will glue up with nice tight even joints.

threaded rod clamp.webp
 
Last edited:
Here is box #2. It was built with a purpose in mind. Hickory at 3" wide, 2 1/4" tall and 5 5/8" wide. Edges are 1/4" and the ends are 1/4+.
This is the front side. When the box was made back in 2011, that gap wasn't there. This is store bought KD 8/4 hickory.
View attachment 289078
Back side.
View attachment 289076

My problem was that the box shrunk near the outer edges leaving the pith area larger, causing the gap seen in the above pictures and this one. There's a gap at the glue joint that's NOT as visible as seen on the left side. My Iphone is really picking out flaws that aren't as bad as the pictures show. That glue seam and corner on the left are barely visible looking at the actual piece.
View attachment 289079

The top is flat, but the bottom is where distortion is.
View attachment 289080

This is the purpose for the box. Black pipe stone from possibly Wisconsin( memory came back). When I was building it, I knew I wasn't going to hinge it, but instead I would drill holes through the edges of the 2 long sides. That way, when the box build was complete, it would be split to give me top and bottom. The holes would align no matter how badly the were drilled. Unfortunately the bit was about 40 thousandths and since Hickory is mean, the bit wandered while drilling. I didn't know until the top was split off from the top. This picture shows how much wandering I had, but the holes aligned.
View attachment 289081

What I then did was get 18 gunge copper wire and inserted into the bottom part of the box to act as ???? to attach the lid to bottom of the box. It works really well but the left side in this first picture was so close to getting this small job tossed.
View attachment 289082
Nuttin like kissing a Rattle Snake to get a good toke.
View attachment 289086


The snake is Mesquite and Palo Verde. I started with a couple pieces if wood 1/2 x 1 3/4 x?. Found center, and then ran a thin kerf groove on both pieces. To verify center, I turned each piece around and ran them again, then glued the pieces together. Shaped the curves and called it quits on that project. I ran a wire through the piece while the glue was still wet to guarantee a good toke.
View attachment 289085
Enough of this. ................. Nubs

View attachment 289077
How hard is it to pull the pins and sand a 1/16th off with a 6" wide belt sander? That would true it up quickly. Or sand the center between the pins, a bit harder but should work.
 
How hard is it to pull the pins and sand a 1/16th off with a 6" wide belt sander? That would true it up quickly. Or sand the center between the pins, a bit harder but should work.
Mark, I'm in no hurry to do what you suggested. That was my plan when I first noticed it. But, wood whording is better than woodworking. I'm not changing my story. ..............Nubs
 
Three things that improved my boxes the most:
(1) Making exact 45 degree miters. Either make a very solid precise sled for your table saw or measure and adjust your miter saw, then make a first cut almost on your line, then a second very thin cut right on your line. Helps keep the blade from deflecting and wandering.
(2) This threaded rod frame clamp is super helpful and accurate. I can quickly put box sides in this thing and check for fit, accuracy etc. and just as quickly take them back out to make adjustments. It acts as a third hand when I need it and holds wood pieces firmly enough to sand, use a Dremel, etc. And it is quick and accurate for glue ups. This one is made by Hargraves. It's pretty old, it was my Dads.
(3) Don't rely on measurements and pencil marks for side lengths. What matters the most is that the opposite sides are exactly the same length. So make one side, then cut one miter in the opposite side. Then put the first side back in the sled or on your miter saw against the blade teeth (not against the inner surface of the blade). Then clamp a stop block against the length of this side. Then put the miter of the second side against the stop block and make your final cut on the opposite side. This ensure those two sides are exactly the same length. Do the same thing for the other set of sides. If you made exact 45 degree miters and the sides are exactly the same length your box will glue up with nice tight even joints.

View attachment 292198
Thanks for the tutorial! From another one of your earlier postings I picked up on how much you liked your Hargraves clamping system. I started looking for one right after that and found one on eBay. Ordered it and it arrived Saturday! Here it is in the original boxes! I’m almost ready to rock ‘n roll! Chuck IMG_4161.webp
 
Mark, when you describe a hinge as a barrel hinge, is that one that you have to drill 3/8 x 1/2" deep matching holes to mount them? If so, can you please tell me how you do it and how thick your sides are? ............... Nubs
Sure thing. I hope this isn't too long.
I use 2 different types/styles of hinges, depending on if I want the lid to open 180 or 90 degrees. The process is the same for both. They are all sized in millimeters with the small 90-degree ones being 5mm diameter width and the 180-degree ones I use are 8mm, 10mm, and 12mm. diameter width depending on the thickness of my box sides. When using the small 5mm 90-degree hinges, you have to put a chamfer on the back of the box bottom and lid, or it won't open properly.
So, I have bought millimeter drill bits just for the hinge holes. Even though the drill size matches the hinge diameter, they can still be a tight fit. I like a snuggish fit but not loose as I test fit the hinges several times before final assembly, and they can't get stuck in the hole. I sometimes need to ream out the holes with a small dowel and small piece of sandpaper wrapped around it.

I build all my boxes complete at first and then saw off the lids.
First, I cut and glue up the 4 side pieces. I have a rabbet sawn into them which I inset and glue the bottom into. I try to get all VERY square.
***Now before I glue on the piece which will be the top, I drill holes for the hinges***
Once those holes are drilled, you can glue on the box's top piece, square up and pre-sand the box a bit. The holes are complete and will reveal once the lid is cut off.

Before the lid is attached, I select which will be the back side of the box and I will drill down through that piece creating holes for the lid's hinges AND the bottom's hinges at the same time. I put the back of the box against my drill press fence, being careful to get the hole's set back the correct distance from the box's rear edge. You don't want the hole too far set back from the box's back if you are using the 180-degree hinges or they won't fit right. Set back distance is usually on the hinge install directions (it's usually a bit less than half the barrel's distances when fully opened). The smaller 90-degree hinges set back distance isn't so fussy, but you will have to put a 45-degree chamfer on the lid and bottom up to half the hole's diameter. You don't want these holes set back too far or you will have large chamfers. Determine how far in from the sides you want the hinges and mark it. Drill the two holes. ***To be clear, you will be drilling down through the entire lid's back and into the bottom piece at once. Yes, there will be a void in the lid above where the hinge will be set, but that will never be seen as the glued-on top will cover it***.

You will need to measure down the back's side and mark where the lid will be cut off at. The hinge hole depth will be a bit below that (adjust for some clean-up where the lid is cut off). Once the lid is off, if the hole is a little too deep, you can add a small piece/shim of wood to bring the hinge up level with it's hole. If it isn't deep enough, carefully redrill it a bit deeper as needed. That should be easy if the drill press fence wasn't moved!
Since you are drilling two holes at once, the lid's alignment will be perfect to the bottom.
barrel hinge 90.webp barrel hinge 180.webp DSC_0001.webp
 
Sure thing. I hope this isn't too long.
I use 2 different types/styles of hinges, depending on if I want the lid to open 180 or 90 degrees. The process is the same for both. They are all sized in millimeters with the small 90-degree ones being 5mm diameter width and the 180-degree ones I use are 8mm, 10mm, and 12mm. diameter width depending on the thickness of my box sides. When using the small 5mm 90-degree hinges, you have to put a chamfer on the back of the box bottom and lid, or it won't open properly.
So, I have bought millimeter drill bits just for the hinge holes. Even though the drill size matches the hinge diameter, they can still be a tight fit. I like a snuggish fit but not loose as I test fit the hinges several times before final assembly, and they can't get stuck in the hole. I sometimes need to ream out the holes with a small dowel and small piece of sandpaper wrapped around it.

I build all my boxes complete at first and then saw off the lids.
First, I cut and glue up the 4 side pieces. I have a rabbet sawn into them which I inset and glue the bottom into. I try to get all VERY square.
***Now before I glue on the piece which will be the top, I drill holes for the hinges***
Once those holes are drilled, you can glue on the box's top piece, square up and pre-sand the box a bit. The holes are complete and will reveal once the lid is cut off.

Before the lid is attached, I select which will be the back side of the box and I will drill down through that piece creating holes for the lid's hinges AND the bottom's hinges at the same time. I put the back of the box against my drill press fence, being careful to get the hole's set back the correct distance from the box's rear edge. You don't want the hole too far set back from the box's back if you are using the 180-degree hinges or they won't fit right. Set back distance is usually on the hinge install directions (it's usually a bit less than half the barrel's distances when fully opened). The smaller 90-degree hinges set back distance isn't so fussy, but you will have to put a 45-degree chamfer on the lid and bottom up to half the hole's diameter. You don't want these holes set back too far or you will have large chamfers. Determine how far in from the sides you want the hinges and mark it. Drill the two holes. ***To be clear, you will be drilling down through the entire lid's back and into the bottom piece at once. Yes, there will be a void in the lid above where the hinge will be set, but that will never be seen as the glued-on top will cover it***.

You will need to measure down the back's side and mark where the lid will be cut off at. The hinge hole depth will be a bit below that (adjust for some clean-up where the lid is cut off). Once the lid is off, if the hole is a little too deep, you can add a small piece/shim of wood to bring the hinge up level with it's hole. If it isn't deep enough, carefully redrill it a bit deeper as needed. That should be easy if the drill press fence wasn't moved!
Since you are drilling two holes at once, the lid's alignment will be perfect to the bottom.
View attachment 292209View attachment 292210View attachment 292211

Mark, your 5 step drawing states it pretty much the way I do mine. The top and bottom parts of the hinged back will always have matching holes, no matter what mistakes you might make along the way. Thanks for verifying that that is probably the correct method for the barrel hinges. ................ Nubs
 
Thanks for explaining your method Mark ( @smallfry ). That's the way my neighbor has done his. The only other way I know of is to use centering pins but even those introduce slight deviations and then when you drill the holes there's chance for more deviation. So ultimately I'd still end up sanding the edges flush. I still hate hinges.
 
Back
Top